
A Lunch In 3 Parts
A Simple Lunch Built Entirely From Preserved and Stored Ingredients That Still Feels Fresh
This blog contains no ads or affiliate links.
A lot of the meals I care about most are not the ones that take all day, or even thirty minutes, with plenty of downtime in between. They are a culmination of a dozen different story lines that meet in one place, without hassle. Food preservation is often seen as something far removed from modern life, for grandmas and aspirational homesteaders, leading us to believe everything they keep in their kitchens and pantries is of their own hand and soil.
In truth, it is something for all of us. It does not have to be an all or nothing game and it does not have to eat up all of your time. Really, it provides anyone with little pots of stored sunshine to make a rainy day easier.
All of these little tasks add up to something so easy it feels like cheating, but you did the work. It is yours to enjoy. I provide each aspect of this meal to you here so that you can find a way to weave what you like into your life. Each part is simple and takes only minutes at a time. It all adds up.
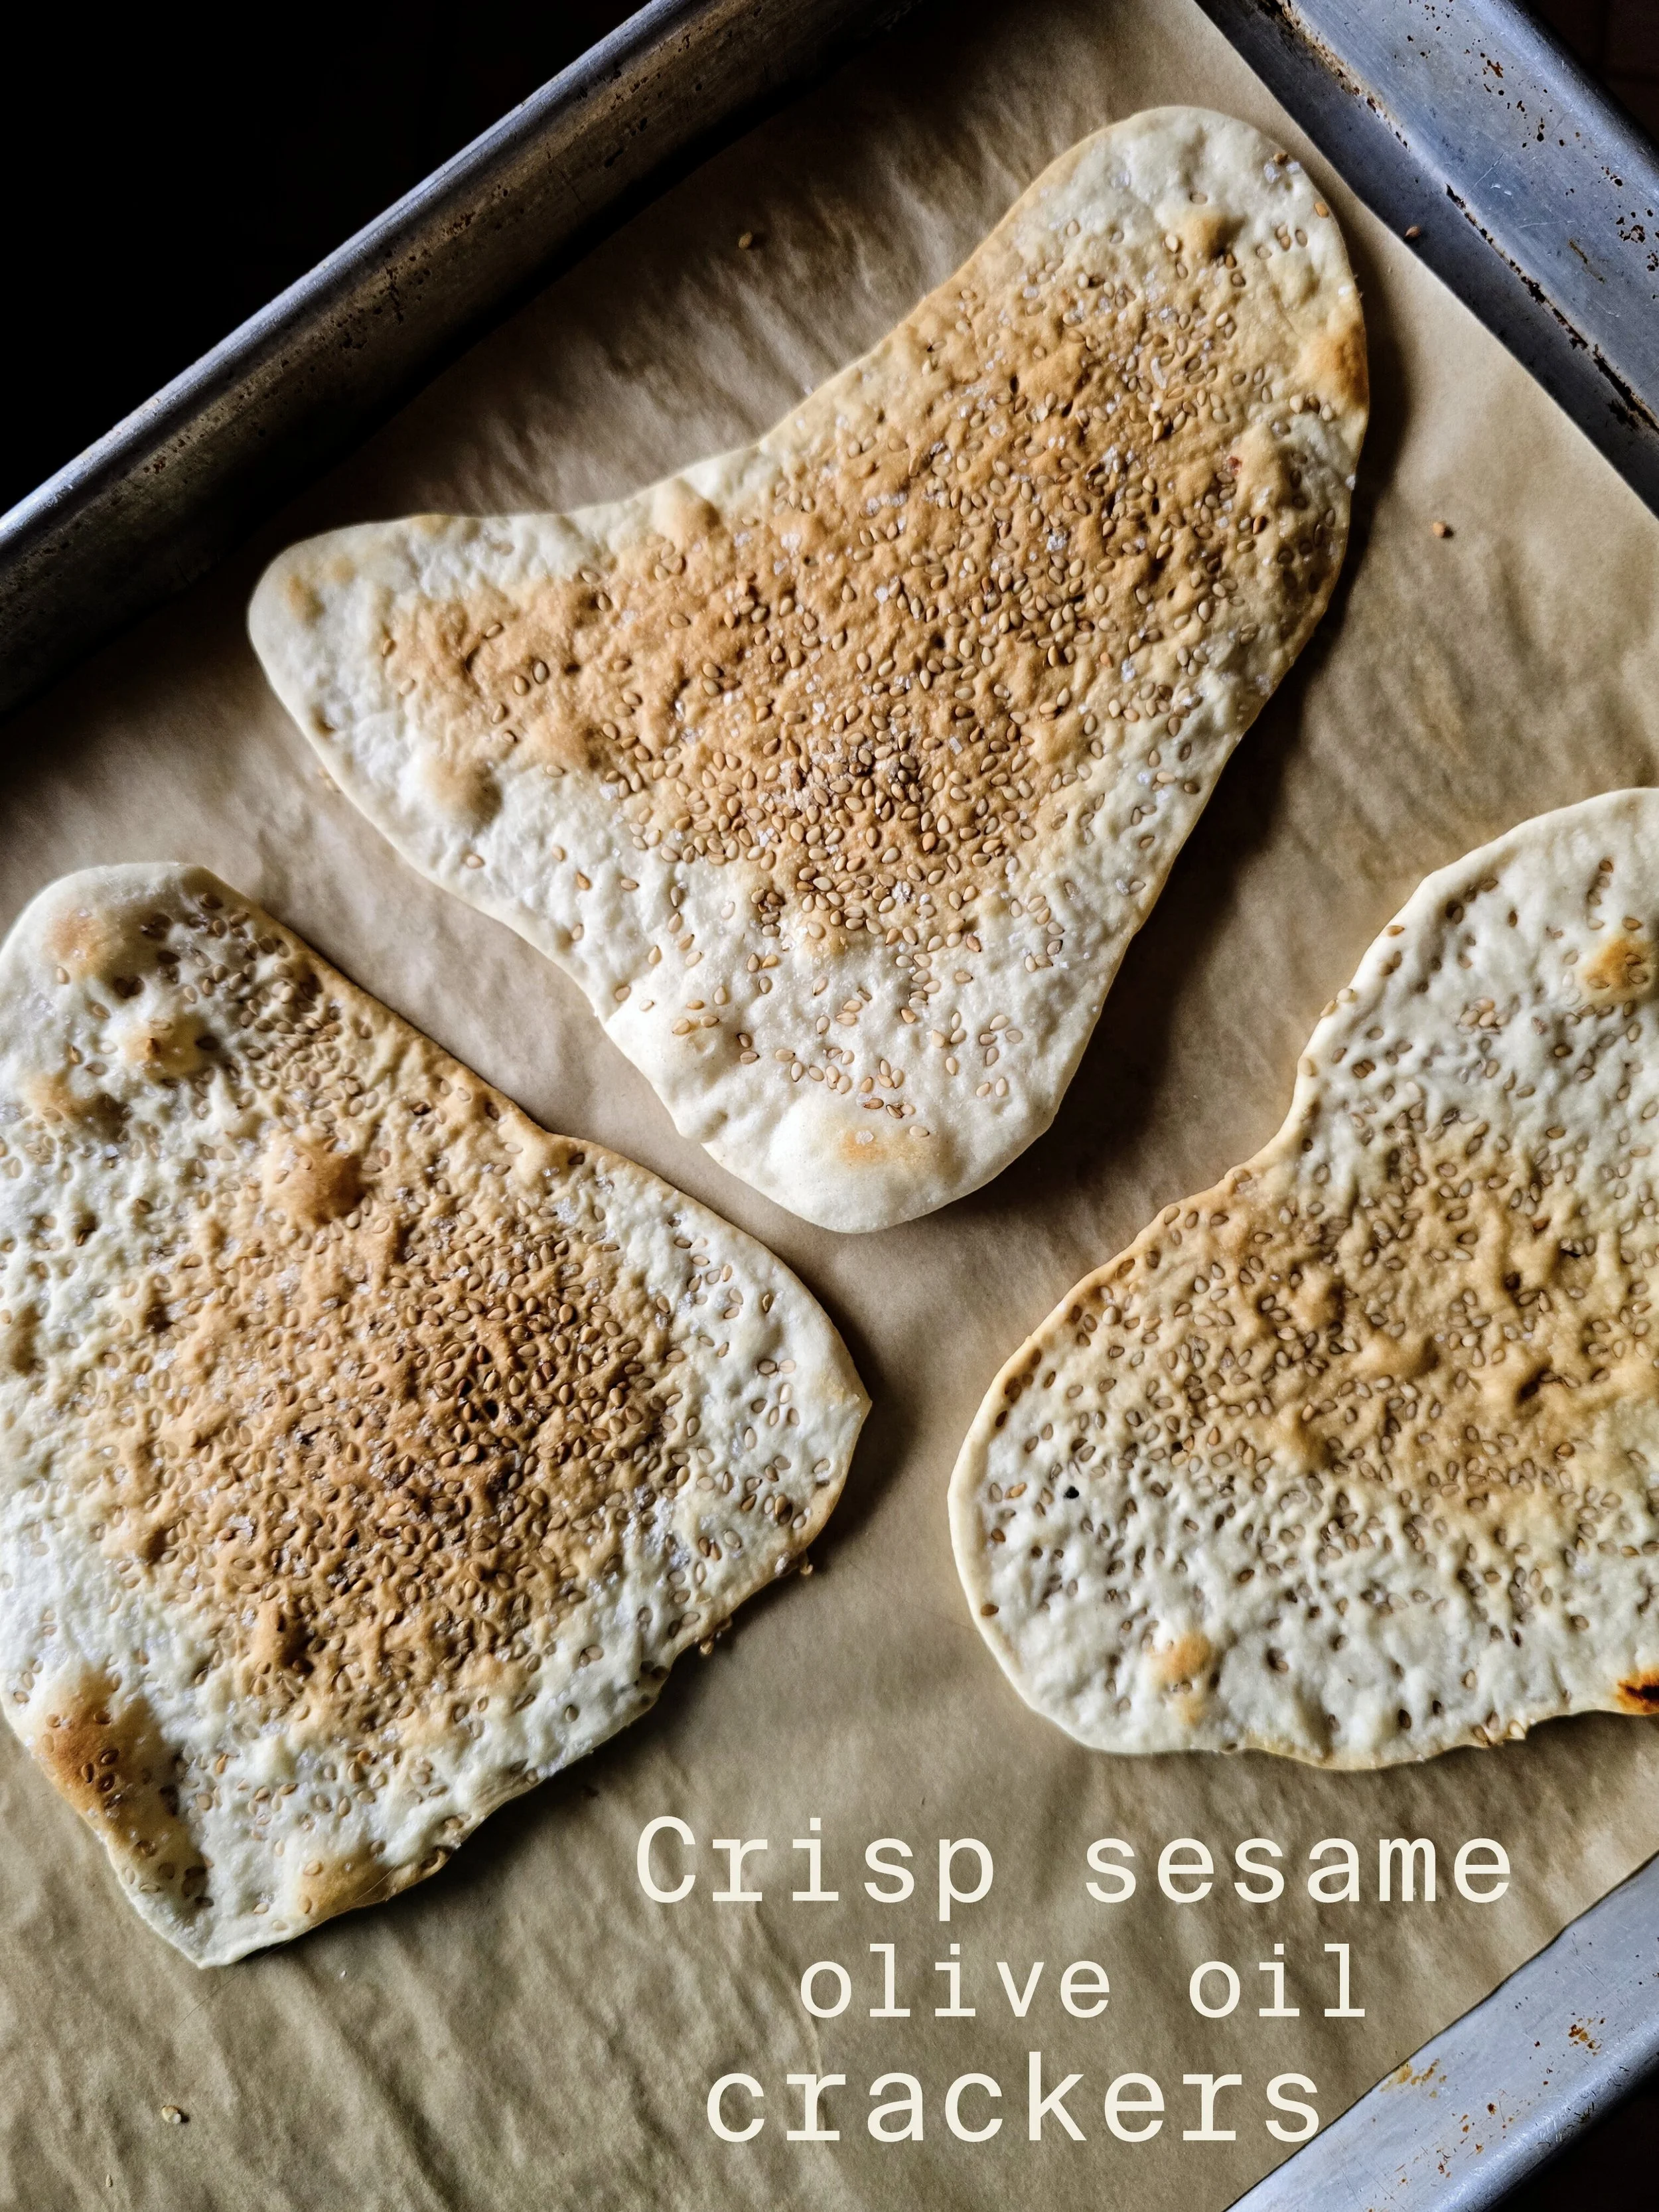
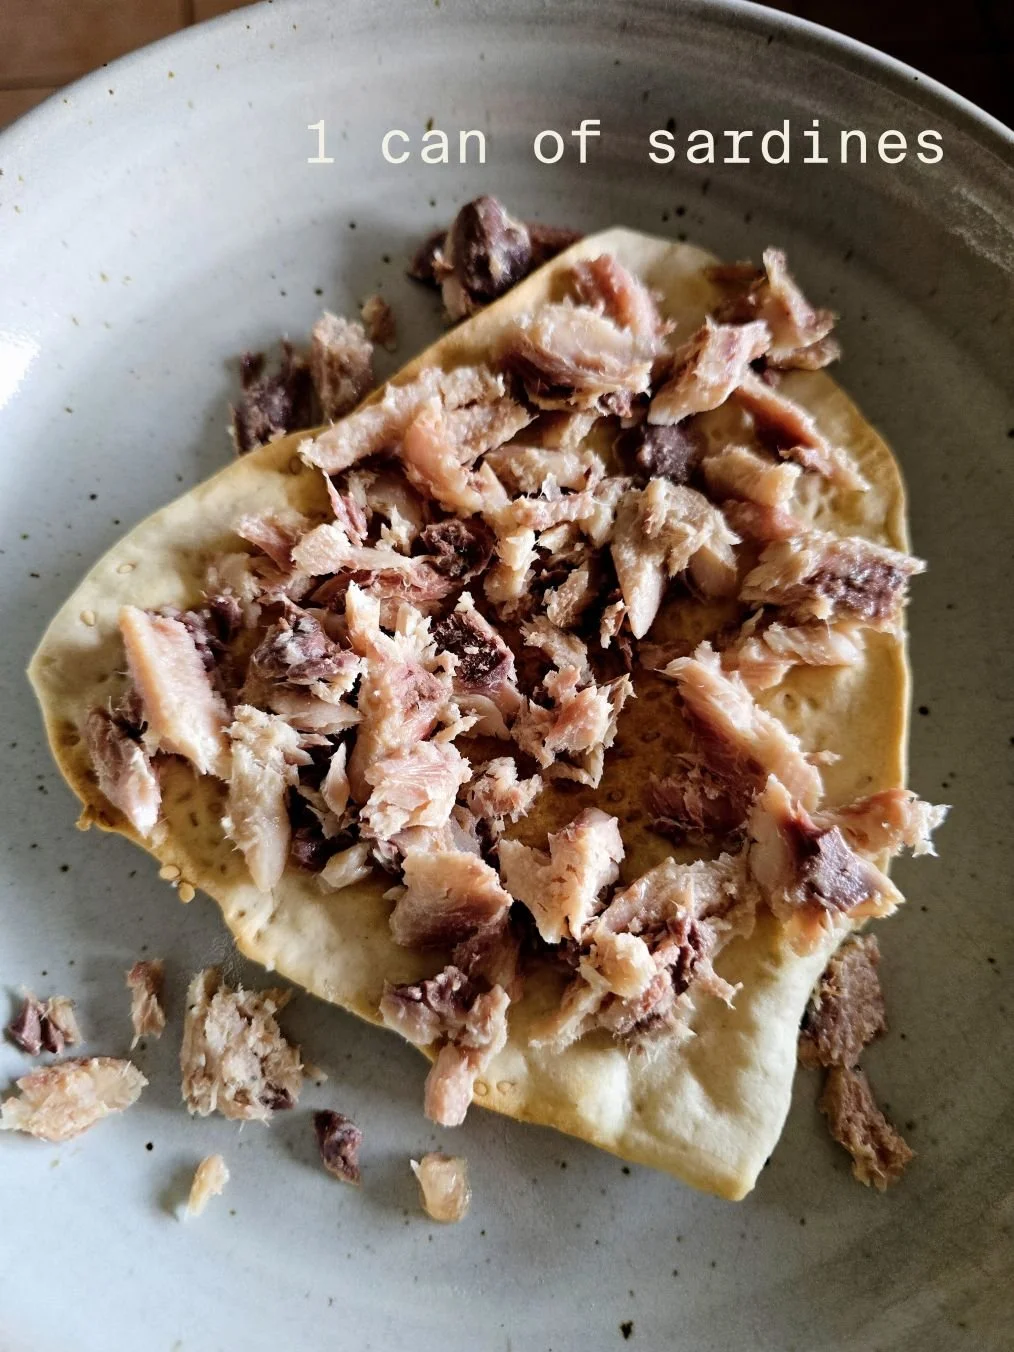
I knew I wanted to use a can of sardines for lunch, but all we had ready to go was Dave’s Killer Bread, green bag. I could have made this on toast, but it felt too reminiscent of my childhood eating cans of cheap sardines in either pepper or mustard sauce on hippie bread, as my dad called it. I wanted something fresher and more crisp. A slice of toasted sourdough would have been perfect, but I did not have that, and I did not have much time either.
What I did have was Fairhaven Mill AP flour, great olive oil, sea salt from my home state, and sesame seeds left over from a failed homemade bagel era. How could I be so silly? I had everything I needed to make an excellent foundation for sardines, and it would only take me a few minutes here and there to throw together.
Ingredients
Fairhaven Mills Organic AP Flour
Terra D’Ylssa Organic Olive Oil
San Juan Sea Salt
Aluminum Free Baking Powder
Raw Organic Sesame Seeds
Fresh Water
We so often think of crackers as something we have to buy, but they are incredibly easy to make and come together very quickly. Keeping high quality, fresh flour on hand can completely change the tools you have to build proper meals, and depending on the route you take, it takes very little time at all. Fresh homemade crisp breads completely blow store bought out of the water. When I asked my husband to try these he said, “Whoa, these taste like those Italian flatbread crackers my mom buys but if they tasted fresh and good. Whoa.”
The flour I am using here is Fairhaven Mills AP from Skagit, Washington. Their flour is milled and sold very fresh, which means it keeps better than many grocery store options without preservatives simply because it has not spent months traveling from mill to warehouse to shelf. I also really love Cairnspring Mills, also in Skagit, but do a little research and see if there are mills near you. Always transfer flours and grains from their sacks into airtight containers and store them in a cool, dark place. Once grain is milled into flour, it stays at best quality for about one year if stored properly. You can also freeze flour to extend freshness and prevent insect activity, especially if you buy in bulk.
The olive oil in these crackers is the Terra D’Ylssa organic Tunisian olive oil I have been getting at Costco. It is single origin and has a Trace Me QR code that lets you see the full life of the oil before it reached you. I keep olive oil in the dark glass bottles it comes in, stored in a cool, dark place. It does not need to be and should not be refrigerated, as cold temperatures can cause clouding and texture changes. Buy good olive oil in quantities you will use within a few months. Unopened bottles stored properly keep best quality for about a year.
The sea salt is San Juan Sea Salt. I love it both as a seasoning and a finishing salt, and I love that it tastes like the San Juan Islands. Keeping good salt on hand makes a huge difference in texture, mineral content, and flavor. Iodized and kosher salt have a very sharp, isolated saltiness compared to sea salts, which have more complexity. I tend to buy San Juan Sea Salt, big bags of Korean sea salt for large projects like ferments from Korean grocery stores, sea salt from Costco, or I browse the salt and spice sections at my local co op. Salt is extremely stable as long as it is kept dry. The mylar bags and jars San Juan Sea Salt comes in are perfect for storage. Transfer other salts into jars or sealed bags if the packaging is not secure. Otherwise, do not worry about it.
I use aluminum free baking powder. It should be stored in an airtight container because it easily absorbs ambient odors and moisture. Baking powder loses strength over time, so for best leavening it should be used within about six to twelve months after opening.
I bought a bulk bag of raw organic sesame seeds for sourdough bagels about a year ago. I always buy raw sesame seeds and toast them myself because pre toasted seeds often lose flavor before they get to you. The nutty flavor of freshly toasted sesame is completely worth it, and when baked onto crackers they toast naturally in the oven. In all honesty, I was very enthusiastic about bagels but my sourdough aspirations did not survive. What I should have done was store these seeds in the freezer, but I told myself I would use them quickly. Sesame seeds pair beautifully with fish, and toasted sesame with sardines is a favorite of mine. Stored in an airtight jar in the freezer, raw sesame seeds will keep excellent quality for one to two years.
I do not need to say much about the water except that we have a beautiful well with naturally filtered, great tasting water. Good water matters in baking and cooking. If you use tap water, I do recommend some kind of basic filtration for flavor and consistency. And if I sound like a snob, just know I am a hose drinker. It just needs to be a hose connected to a nice well.
The full cracker recipe will be posted two days after this goes live. Folks on my email list are the first to know when new blogs and recipes are published. Sign up here if you would like to be notified when the cracker recipe and future posts go up.

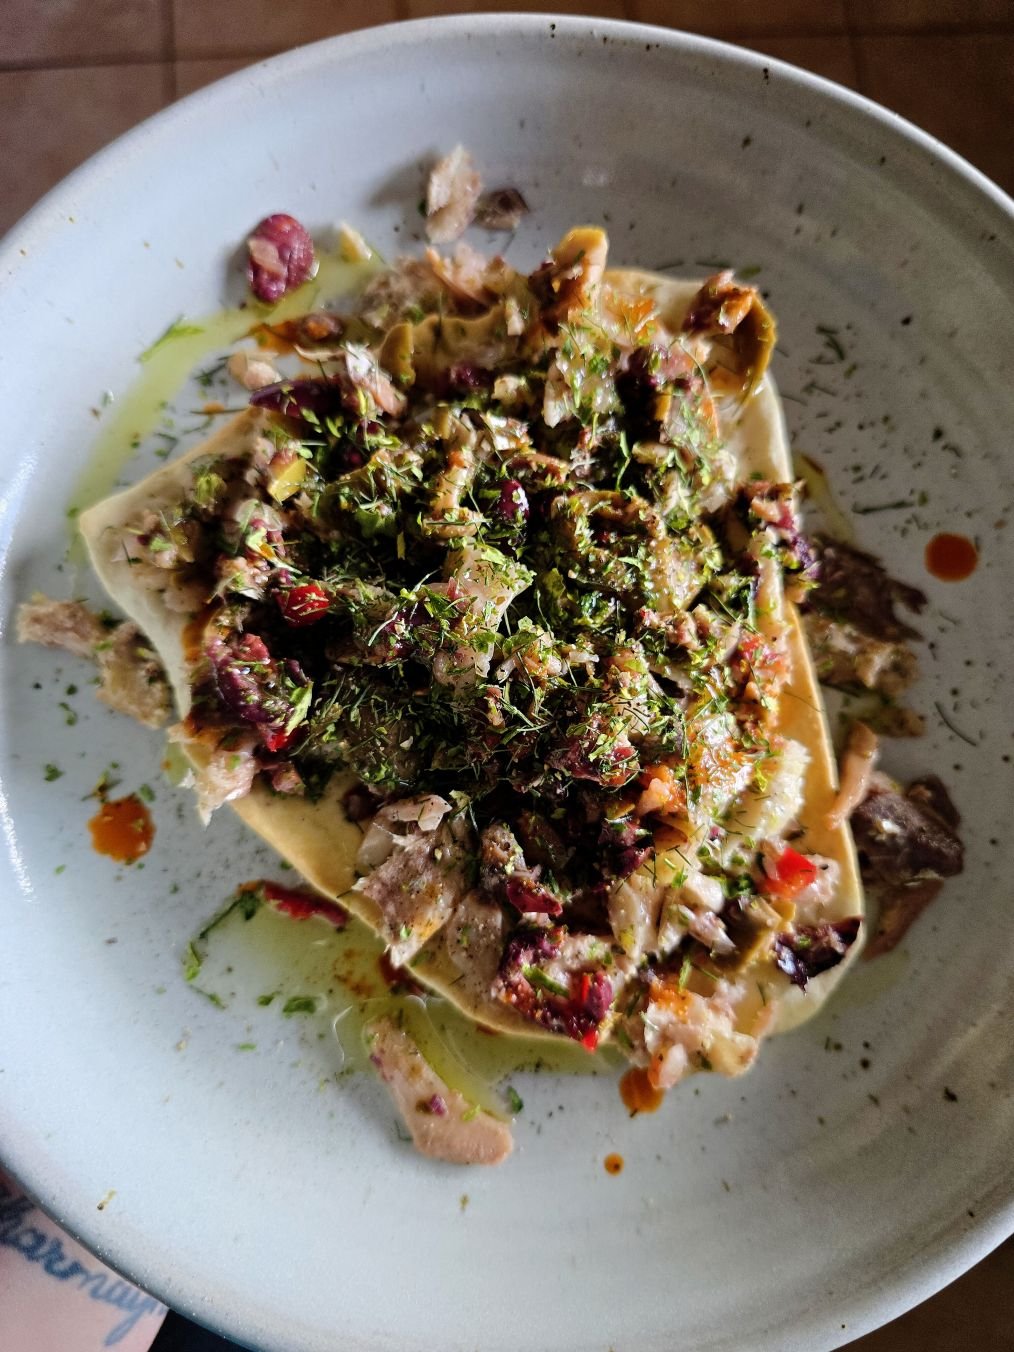
Now that the crackers were finished, all I needed to do was build what I am calling a Mediterranean melting pot tostada. For this lunch, all I had were Season brand boneless skinless sardine fillets canned in olive oil, which I like just fine. They are more like canned tuna to me, and if you are sardine squeamish they are a great place to start. I personally prefer Wild Planet Wild Pacific Sardines in extra virgin olive oil, lightly smoked, bone in, and skin on.
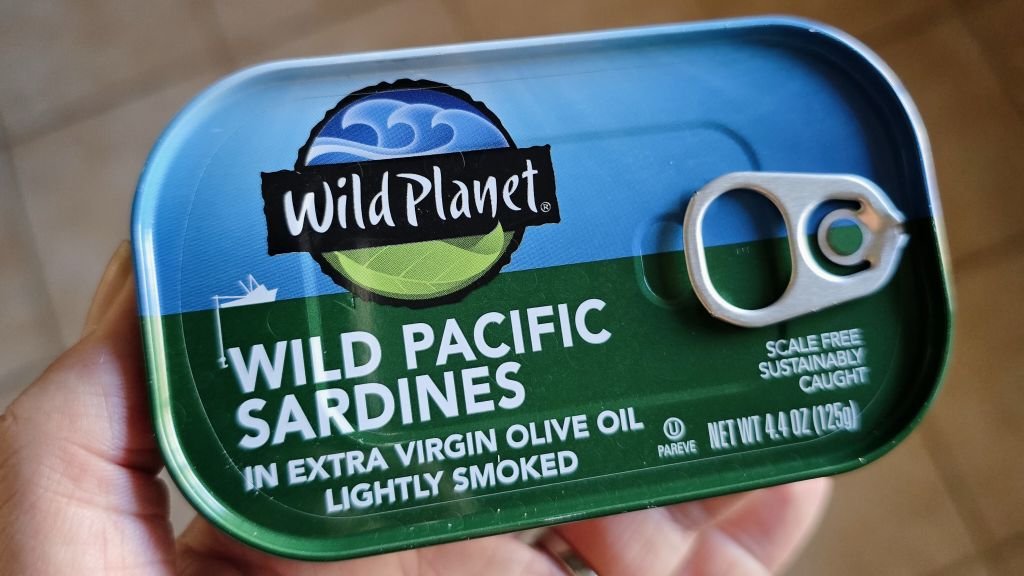
The bones in canned sardines are so small that once they are pressure canned they become completely soft. They can be eaten easily and contribute calcium, though this is entirely up to you. I find both Season brand and Wild Planet at Costco in six packs for about $10.99 and $12.99. Buying high quality, sustainably sourced sardines in bulk can save as much as fifty percent per can compared to buying them individually, and it means I always have some on hand for days like this when I want something nourishing but simple.
Storing canned sardines is easy. Kept in their original cans in a cool, dark place, they will hold good quality for at least two to three years, often longer if the cans remain undamaged. I simply flaked the fish over the crackers before moving on to the final step.

Recently we went on a road trip to Oregon from New Mexico to visit family for Thanksgiving. To ensure we had the safest route for the season, we went west through Arizona and then north through California. Not only did I want to avoid snowy mountain passes, I needed to stop at Granzella’s, one of my favorite Italian delis and roadside gems. I make a point to visit whenever I can. I highly recommend seeking out local shops that carry their own products when you travel and bringing a little of them home with you.
Sure, I make a whole menagerie of my own pickles and ferments, and those are wonderful too, but part of the magic of a jar is not just that the food inside is delicious. It is that it holds the memory of where it came from. I think there are subtle, nonphysical nutrients in the feelings we get from remembering the places and people behind our food. I am certain some culture has a word for this kind of spiritual or emotional nourishment, but in English all I have is a handful of sentences to poorly describe something so big.
Do you know what I mean?
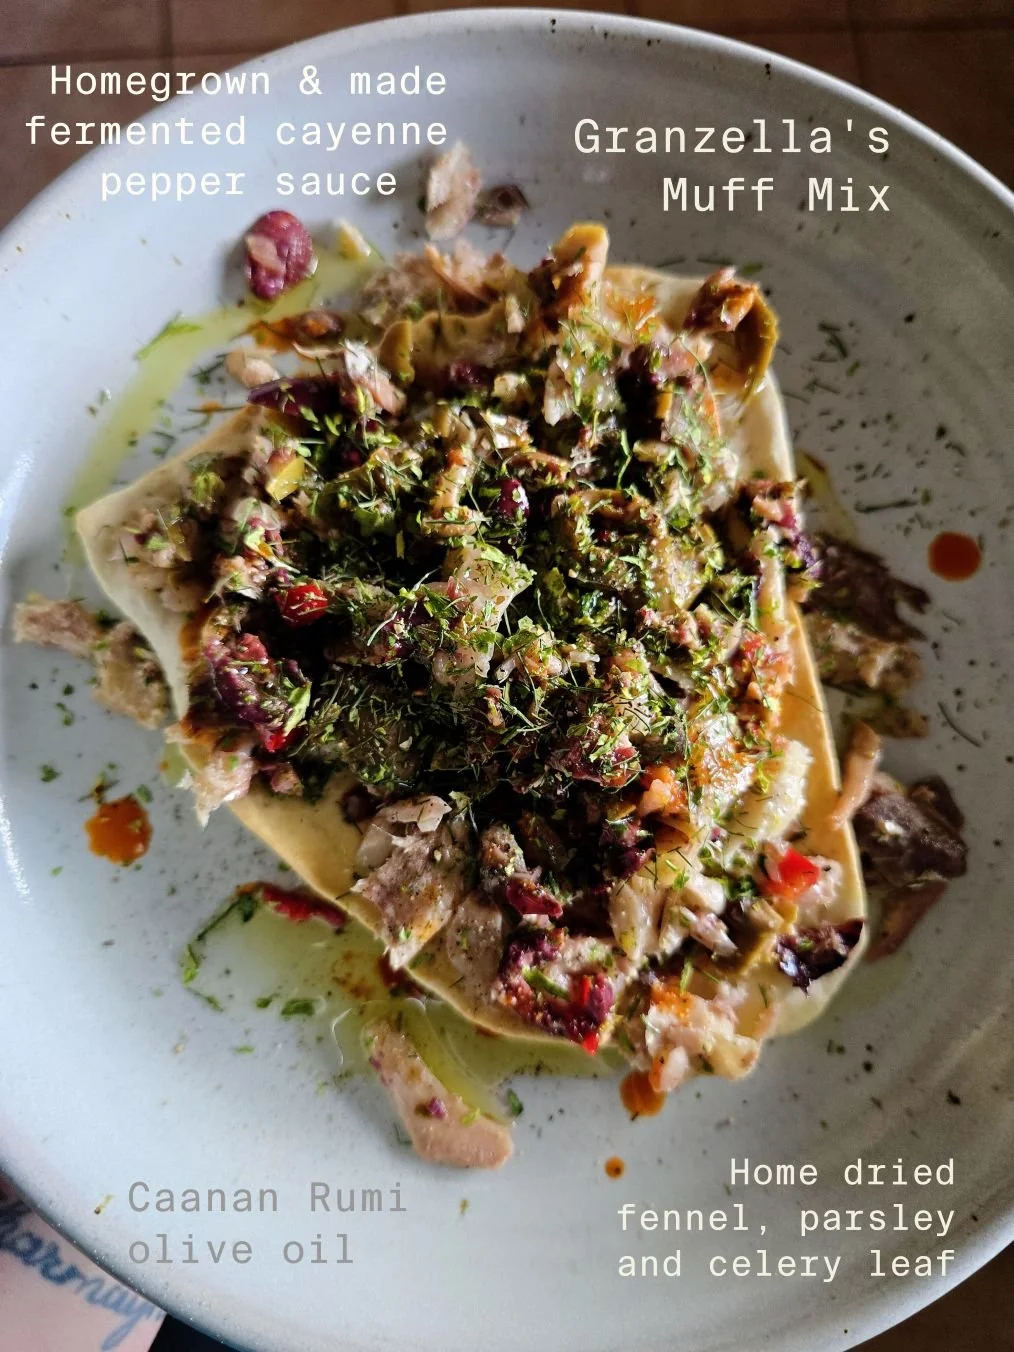
To finish, I used a slotted spoon to scatter the muffuletta over the flaked sardines so I got all of the olive salad without too much of the brine. Using a clean utensil every time you go into a jar of preserved foods helps prevent contamination, and things like pickles and olive mixes can last a very long time in the refrigerator when handled this way. For best quality, they are usually at their peak for about a year once opened.
After the muffuletta, I drizzled a little Canaan Rumi olive oil over the top. It is one of my all time favorite olive oils, pressed from olives grown on thousand year old trees in Palestine. Canaan’s Nabali oil is their lighter, brighter finishing oil, while the Rumi is more robust and often used for cooking, but to me the Rumi is so complex and beautiful that I love using it as a finisher as well. I enjoy all of their oils. This bottle was given to me by clients after I catered their wedding, which means every time I use it I am not just tasting olive oil, I am tasting a story. It carries memory and history onto the plate in a way that feels just as real as flavor. Although it is not an inexpensive bottle, a little goes a long way, and I have been using this same one for a year and a half.
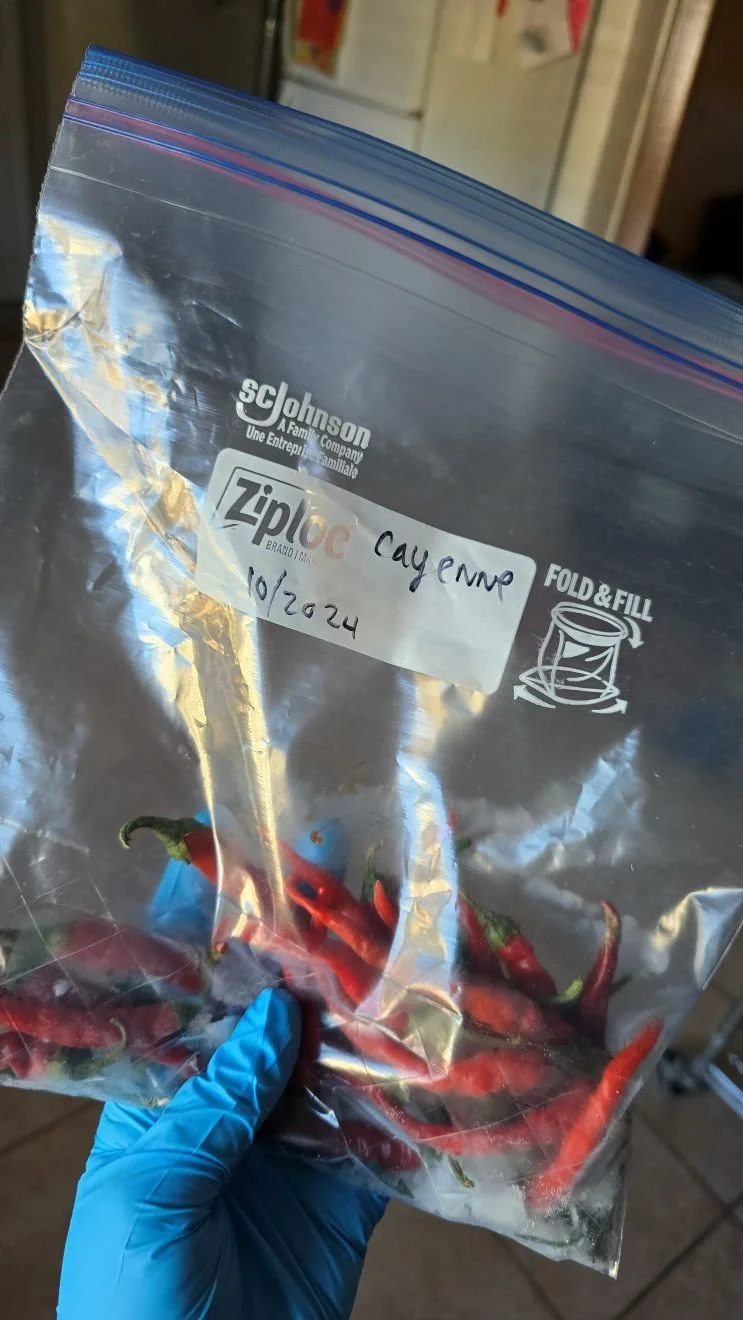
Next, I drizzled on some homegrown, homemade fermented cayenne hot sauce. To make it, I used red cayenne peppers from our 2024 garden that I had kept in the freezer. Fresh peppers freeze beautifully when time is short and I need to get back to them later. Just toss into a zip top bag or other airtight container and store in the freezer. Lower moisture chiles like cayenne hold their texture especially well and can be used much like fresh. Higher moisture peppers like bells freeze well too, though I prefer to roast them before freezing.
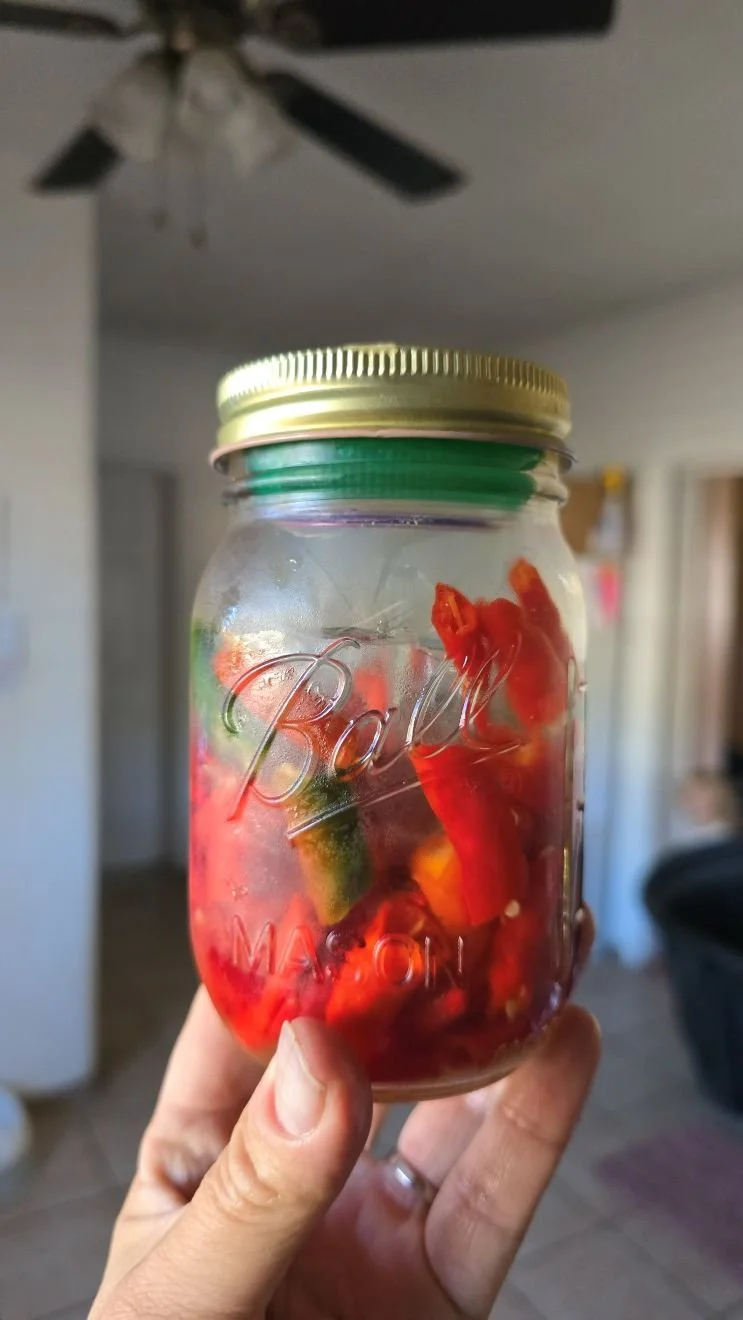
To ferment the peppers, I made a six percent salt brine, which is six grams of salt per one hundred grams of water. I added the chopped peppers to a clean jar, poured in enough brine to cover them, then used a small zip top bag filled with the same brine as a weight to keep everything submerged. The jar sat on the counter for about three weeks, and I checked it occasionally to make sure no surface mold developed. White yeast can be skimmed off, but mold means the batch should be discarded.
To make the sauce, I blended the fermented peppers with about a quarter of the brine and one garlic clove, then strained it through fine mesh. All of these steps took only a few minutes at a time, but together they created something bright, alive, and exactly what this plate needed.
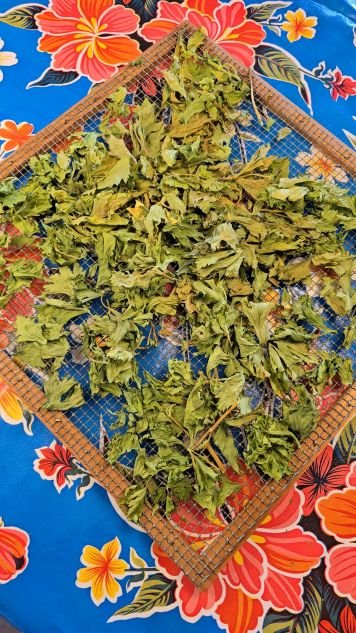
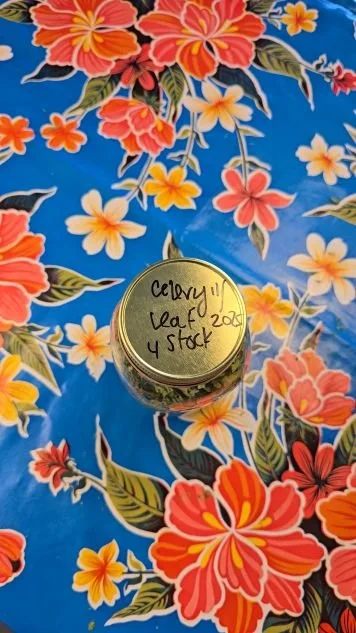
And finally, I cracked some fresh pepper, added a bit of lemon zest, and sprinkled the whole cracker with a menagerie of dried herbs I have been stocking away all year, including parsley, celery leaf, and fennel fronds. Drying herbs is extremely easy and safe, and it is yet another food preservation method that takes only a few minutes per step, with plenty of time in between. Drying your own herbs saves a lot of money compared to buying them, makes use of the abundance in your garden or at the farmers market when herbs are in season, and concentrates their flavors. When fresh herbs are growing, I would use this same mix chopped fresh, but since it is winter I reach for what I have, which is dried.
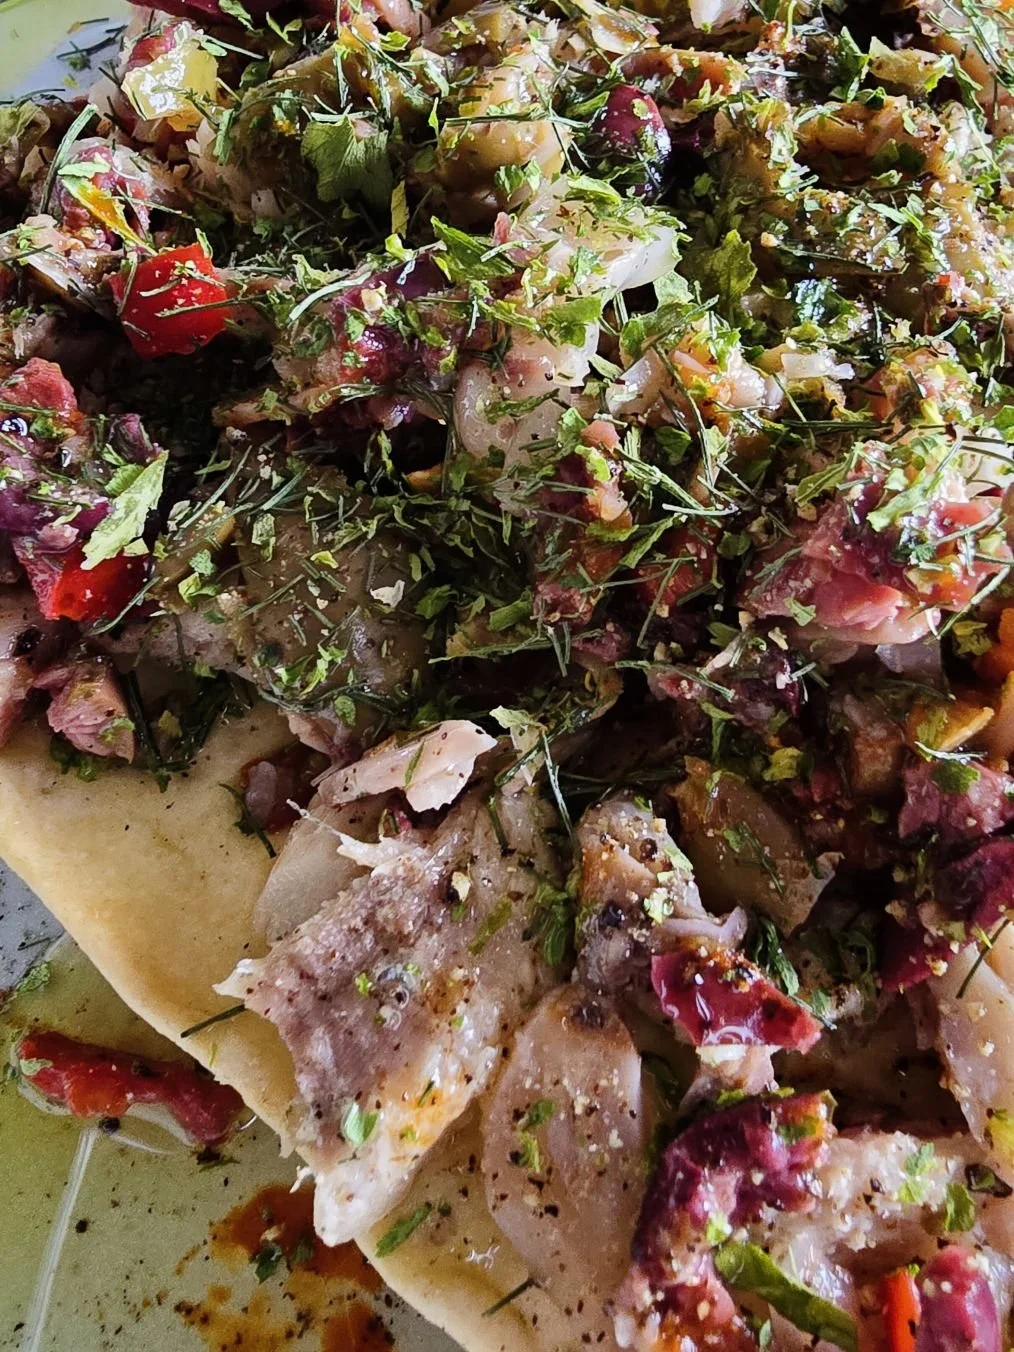
A close-up of the cracker with all the herbs and final garnishes.
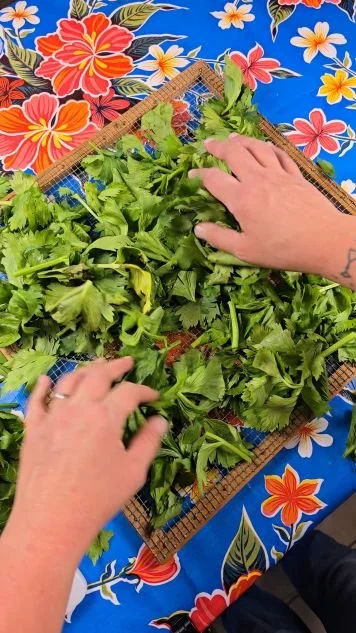
To dry herbs with a dehydrator, pick the leaves from the stems, then wash and dry them very well. I highly recommend keeping a salad spinner on hand for washing and drying greens and herbs of all kinds. I fill the bowl with very cold water so the herbs can float while dirt and sediment sink. Then I lift them out with the basket, pour off the dirty water, and repeat until the water runs clean. After that, spin the herbs until they are as dry as possible. I have used the same OXO spinner I found at a thrift store for over ten years.
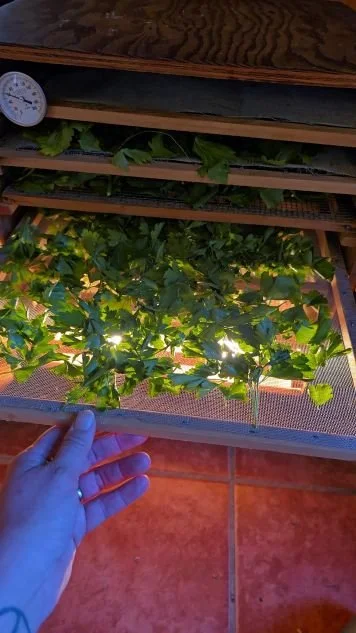
Spread the herbs evenly over your dehydrator trays and set the machine as low as it will go, ideally between 90F and 100F. Dry for about eight to twelve hours, or until they are completely crisp. You will know they are ready when the leaves crumble easily between your fingers.
To dry herbs without a dehydrator, wash them well on the stem as described above, then tie them into small bundles with cotton twine. Hang the bunches upside down in a warm, dry place with good air circulation. In winter I hang them behind the stove pipe for our furnace or wood stove, as long as it is not too hot. In summer, a sunny window works well. This usually takes several days to a week. They are done when they are fully dry and brittle.
For woody herbs like thyme, rosemary, and sage, I almost always hang dry them rather than using a dehydrator.
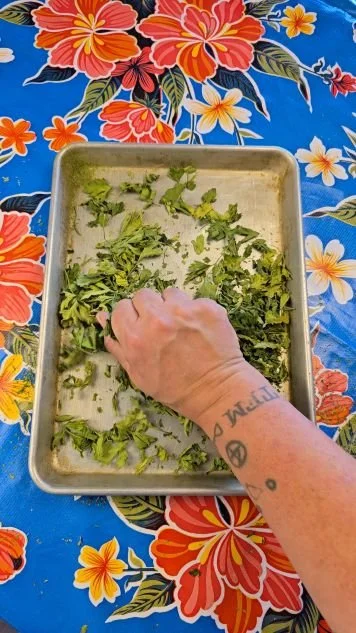
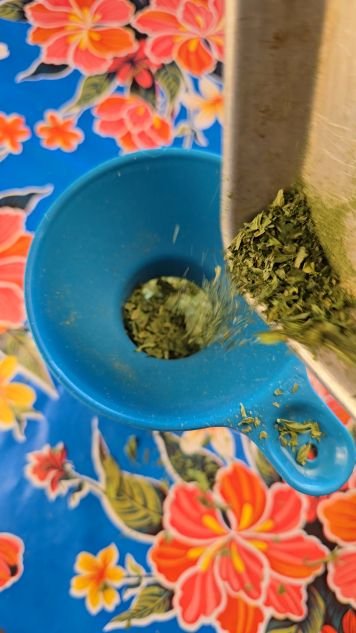
To store dried herbs, crush them to your desired texture, transfer them to a jar, and secure a tight lid. Label the jar and keep it in a cool, dark place. When stored airtight, dried herbs keep their best flavor for about one year, though they can remain usable for up to two years.
I have made this cracker twice since the first time, and in each round it has shifted slightly. That is part of what I love about it. There are so many ways to use what you have on hand and make it your own. You can use any canned fish you like, or even chopped roasted chicken. You could try a soft, spreadable cheese like chevre instead of fish. In the summer, swap in fresh herbs and more lemon. Add arugula or any greens you have around. Let it change with the seasons and with your shelves.
My hope with this post was not to hand you a fixed recipe, but to show you a way of cooking that makes stored food feel alive again. When you keep a few good things on hand and learn how to care for them, you are never very far from a good meal. Even in the middle of a loud day, even when time is thin, even when the fridge looks bare. That is the real gift of food preservation. It turns what you already have into something worth sitting down for and sharing.
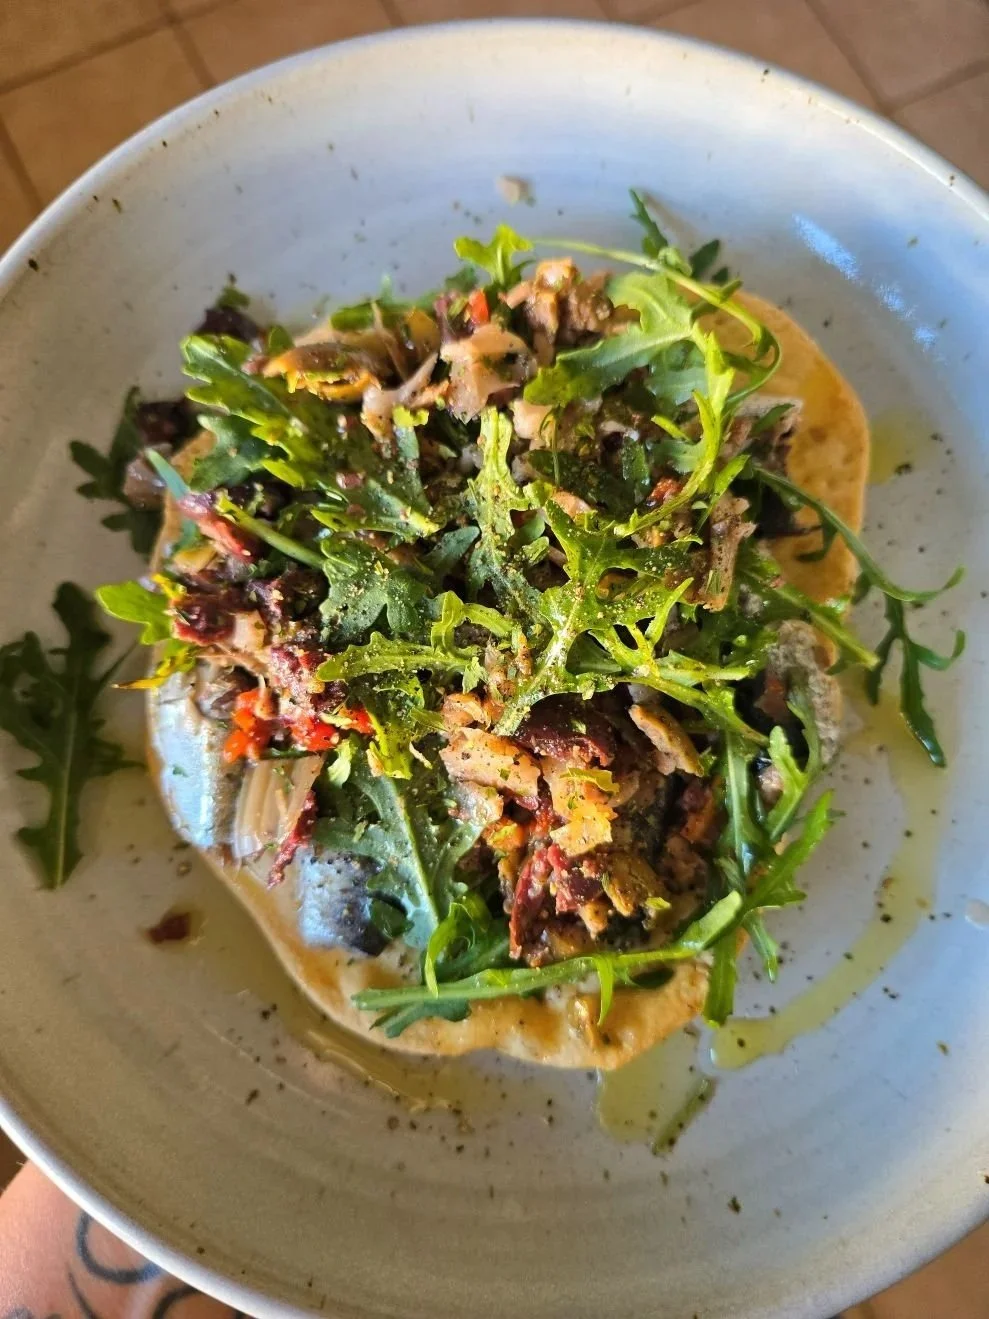
The sardine cracker featuring fresh arugula.
The plate featured in this blog was made by my dear friend Stephanie of Mouth Water Pottery, out of Bellingham, Washington.