
Ratatoullie from Home Grown and Stored Ingredients

Ratatoullie in my Great Grandmother Grace’s enameled cast iron baking dish, layered, seasoned, and dotted with butter before baking at 425 for 45 minutes.
Some people may ask, why go through the trouble of storing food when we have all the most modern conveniences at our finger tips? The work of growing or buying from local producers to get it into the kitchen, wash it, process it, and either jar it or bag it. Then months later, put more work in to get it to a finished dish?
We have been far too conditioned by commodity to recognize the absolute beauty that exists in this work. Conveniences are killing us figuratively and very physically as we speak. They contribute to vast amounts of wastes, emissions, health problems, and viable land loss.
Not only can sourcing locally help preserve our environment while putting money back into the local economy, it is some of the most special food you will ever have in your life. That work adds up, and when I can’t grow everything we need I feel just as good about buying from small local farms who similarly put their heart and soul into what they do.
I have walked away from careers and places with unfathomable luxury. I have cooked for people at the top of their game, trained in the public eye. But what I am constantly chasing is a tiny thread easily lost in those spaces.
Honing in smaller and smaller to the root of where I come from and returning home is the walk for me. This very special magic is there for anyone willing to put a bit of the work in and this is what I want to share with you.
There is no ingredient more spectacular than the ones you see from start to finish. The plants you remember fawning over in the warm summer months, the shining harvest with a smile across your face, lovingly processing to capture a bit of this light getting you through the cold dark periods when it seems nothing could possibly return.
Growing and storing food is a practice that keeps us in tune, reminds us of what's to come, and that nurses us with the very nutrients beneath our feet. I feel a deep call to return to the ancestral practices that not only save me in the dead of winter, but that I believe can take part in saving the world.
It is for everyone, in whatever capacity we are able. If you feel the call, answer it.
Storage Ratatouille:
This is a very loose interpretation of a classic recipe I was inspired to make purely by what I had on hand, you are welcome to adjust as you see fit or use this simply as a food storage guide. If you do not have these items on hand now, pin this for later as inspiration when our gardens are bursting at the seams.
Each vegetable featured has a few quick steps involved to store and when removing from their slumber before using in this and other recipes.
Tomato

To store fresh tomatoes:
One of the most loved garden plant we recognize most is tomato. Often we end up letting our bounty either go to waste or we give it away due to overwhelm and thinking that saving tomatoes is complicated and dangerous. Nay nay!! One of the easiest ways to preserve tomatoes is by simply popping out the eye and freezing them whole in bags. Home canned tomatoes are amazing, but here in my home we do both.
To Defrost Frozen tomatoes:
Remove the bag from the freezer and allow to defrost on the counter, which will take a few hours. Or defrost in the fridge for a few days.
Once defrosted:
The peel will slip off very easily and then use your frozen whole tomatoes literally anywhere you use canned or even fresh. Will not replicate the freshness of a sliced tomato in say a caprese salad, but frozen whole peeled tomatoes go almost any where and do almost anything their fresh counterparts can. I season with a bit of sea salt and pepper and either cut into chunks or crush with my hands before using.
Zucchini

To store fresh zucchini:
If they are small with tender skin I do not worry about peeling or seeding, if they have gotten very large I like to peel and seed before shredding. Once they are shredded I store them in ziplock bags in the freezer. You can also cut into chunks and either blanche in salted boiling water or roast before bagging and freezing.
To Defrost Frozen Zucchini:
Remove the bag from the freezer and allow to defrost on the counter, which will take a few hours. Or defrost in the fridge for a few days.
Once defrosted:
Pour the bag of zucchini into a bowl lined with a colander and drain any water. Press firmly either in your hands or through a clean cloth to really drain well before using. I like to season to taste with sea salt and fresh pepper before applying to a recipe. Afterwards, shredded zucchini goes wonderfully in vegetable pancakes, casseroles, soups, dumplings, fillings or almost anywhere you love zucchini.
Eggplant
To store fresh eggplant:
When we grow eggplant in the right conditions, you may encounter a vast bounty. You can certainly give some away but why not save some for later, long after the last leaves have fallen? There are many ways to store eggplant fresh from the garden. You can preserve in olive oil by either jarring and freezing or pressure canning, you can make mutabal or baba ganouj and pressure can or freeze, but one very easy and quick way I love might be the most inspiring for folks short on time. I simply cut into chunks, toss in salt and olive oil, roast at 425 until just tender but not excessively soft, and freeze on a tray before bagging. I can make baba ganouj, stews, pasta sauce, fritters, and more from storing it this way as it is as close to its natural form as possible.
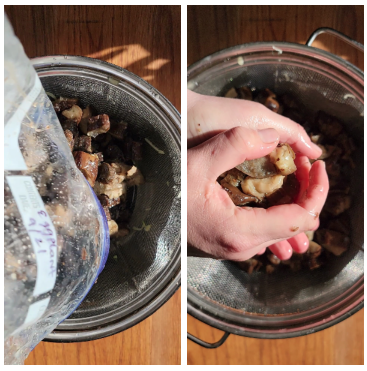
To defrost eggplant:
Remove the bag from the freezer and allow to defrost on the counter, which will take a few hours. Or defrost in the fridge for a few days.
Once Defrosted:
As with the zucchini, pour the bag of eggplant into a bowl lined with a colander and drain any water. Press firmly either in your hands or through a clean cloth to really drain well before using. I like to season to taste with sea salt and fresh pepper before applying to a recipe. Afterwards, frozen lightly roasted eggplant can be further roasted and served as a side or made into dips or pasta sauces, stews, fritters, and pretty much anywhere you use eggplant normally.
Bell Peppers

To Store Bell Peppers:
As with tomatoes, there are many ways to store bell peppers, and infinite recipes. However when I am short on time I have two go to methods, roasting/peeling/pickling and straight up roasting followed by bagging and freezing whole skin seeds n all. Those are the two methods featured in this recipe.
To Defrost Peppers:
If frozen whole in a bag, remove from the freezer and allow to defrost on the counter, which will take a few hours. Or defrost in the fridge for a few days.
Once Defrosted:
As with the tomatoes, pour the bag of peppers into a bowl lined with a colander and drain any liquid. The skins will slip off like magic, and then I remove the seeds and rinse under the faucet and drain. If using canned pickled bell peppers, pour into a bowl with a colander and save the liquid to make marinade or vinaigrette. Use for flat breads, dips, stews, fresh recipes, or anywhere you like peppers.
Putting it together:
To watch this recipe come together in video, you may view it here.
After defrosting, draining, and seasoning each item I layered them in my baking dish. Drizzled with olive oil, seasoned with home dried parsley, a bit more salt and pepper, dried oregano, and dotted with butter before baking at 425F for about 45 minutes or until golden and bubbly. Serve along side your favorite proteins, pastas, or rustic bread.